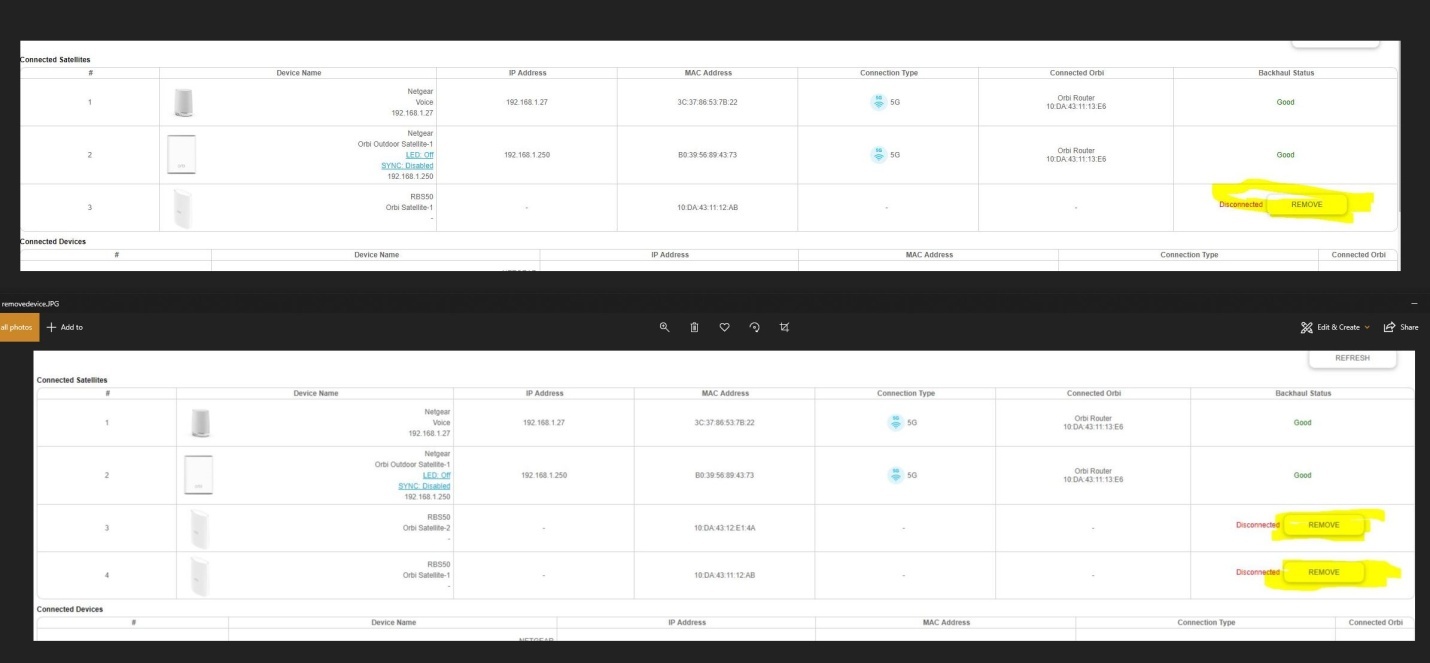
The Orbi Network map allows you to check the status of the internet connection and Orbi satellites. To access the Network map, you need to tap on the image of your Orbi on the main page of the Orbi app. But, there are times when you want to remove a particular satellite from the Network map. This blog will help you learn how to remove Orbi satellite from Network map.
Steps to Remove Orbi Satellite from Network Map
You can remove the Orbi satellite by accessing the web GUI of the router. You can opt for this option if your satellite is not working at all and you want to replace it with a new one. The steps to remove the satellite from the network map are listed below.
- Ensure that your Orbi router is plugged in.
- The router’s lights must be stable.
- Once ensured, you are required to connect your PC to the WiFi network of the router.
- If the router is working on the default WiFi details, you can check the details from the label of the product.
- Now, load an internet browser and go to orbilogin.net.
- When the login page shows up, type the correct details into the given fields.
- Username is admin
- Password is password
- The details are in lowercase.
- The Orbi router Status page will appear when you click the Log In button.
- Under the Basic tab, click Attached Devices.

- Tap the satellite that you want to remove from the Network Map.
- You will see the current status of the satellite.
- Under the Backhaul Status, select Remove.
- The Remove option won’t be available if your Orbi satellite is powered on. Thus, ensure that the satellite is powered off.
- Your Orbi satellite will be successfully removed from the Network map.
This is how you can remove the satellite from the Network map of the app. Now, you can connect Orbi satellite (the new one to your router if you want) by pressing the Sync button on the router as well as satellite. However, if you fail to remove the satellite, we recommend you resetting it to the default factory settings and remove it once again using the above-mentioned steps.
Reset Satellite If You Can’t Remove It
Here are the steps that you should follow to reset your Orbi satellite to the default factory settings:
- Turn on your satellite and look for the Reset button.
- Press the button using a sharp object. It can be a paper clip or a pin.
- After holding the button for 7 seconds, release it.
- The satellite will now start working on the default factory settings.
Now, you should switch off the satellite and try to remove it one again from the Network map using the instructions provided in the previous section.
The Bottom Line
This was all about how to remove Orbi satellite from the Network map. We are expecting that after taking the help of the given information, you will successfully be able to remove the satellite. You can now resume your network experience.
